Configuration Tool
The rtctkConfigTool is a graphical and command line tool used to inspect, retrieve and
manipulate configuration data from the Persistent Configuration Repository
and the Runtime Configuration Repository.
Metadata Initialisation
To use the Runtime Configuration Repository that is using the OLDB backend, the RTC Toolkit-specific
metadata instances need to be initialised in the CII configuration service, i.e. the type metadata
for RtcInt32, RtcDouble, RtcMatrixDouble etc.
This only needs to be done once for a new instance of the OLDB.
The init-metadata sub-command is available in the configuration tool to easily set this metadata
up. One can run the command as follows:
$ rtctkConfigTool init-metadata
The command is idempotent and can be run multiple times without any change after the first initialisation. However, any RTC Toolkit metadata instance that is changed after this command was applied will be overwritten to their default values by running this command again.
Tool Setup
The rtctkConfigTool itself can be configured to make it more convenient to use.
The tool also stores its own configuration information in the Persistent Configuration Repository as
datapoints, which can either be backed by the CII central configuration service or local files.
All these tool configuration datapoints are optional and can be overridden by command line options.
Command line options take precedence over those given in the Persistent Configuration Repository.
If a particular configuration value is not provided by any means, then rtctkConfigTool simply
uses internal default values in that case.
The location of the tool’s configuration can be provided as the command line option --config.
The following configuration datapoints for the tool are available:
/rtctk_config_tool/log_levelThe logging level to use for the tool.
This can be overridden by the
--log-levelcommand line option./rtctk_config_tool/log_to_fileA flag indicating that logging should also be directed to file and syslog.
This can be overridden by the
--log-to-filecommand line option./rtctk_config_tool/service_discovery_endpointIndicates the URI endpoint of the service discovery from which the
runtime_repo_endpointandpersistent_repo_endpointwill be loaded.This can be overridden by the
--service-discovery-endpoint | --sdecommand line option./rtctk_config_tool/runtime_repo_endpointExplicitly sets the URI endpoint for the Runtime Configuration Repository.
This is an alternative to using
/rtctk_config_tool/service_discovery_endpointto find the endpoint in service discovery.This can be overridden by the
--runtime-repo-endpoint | --rtrcommand line option./rtctk_config_tool/persistent_repo_endpointExplicitly sets the URI endpoint for the Persistent Configuration Repository.
This is an alternative to using
/rtctk_config_tool/service_discovery_endpointto find the endpoint in service discovery.This can be overridden by the
--persistent-repo-endpoint | --psrcommand line option.
Command Line Repository Operations
The rtctkConfigTool supports sub-commands on the command line that allows the following kinds of
operations and manipulation on a repository:
get
set
delete
list
read
write
validate
populate
In all cases, a detailed listing of available command line arguments and options can be seen with
the --help option.
For example:
$ rtctkConfigTool --help
For options available for a specific sub-command, e.g. get, one would use the following:
$ rtctkConfigTool get --help
In most of the examples shown in the sub-sections below,
it is assumed that the rtctkConfigTool is already configured to find the repositories as
indicated in the Tool Setup section.
If this is not the case,
then one can simply explicitly add the extra options to indicate the repository locations,
e.g. --rtr <uri>, to the examples shown in the sub-sections.
Here is an example of using the --rtr option:
$ rtctkConfigTool --rtr cii.oldb:/example/runtime_repo get runtime /data/my_data_point
Note
When attempting to manipulate a nonexistent Persistent Configuration Repository with the set or write operations and using the cii.config://local/ URI prefix, i.e. using persistent for the repository, it will not be possible to deduce the location of the repository. Therefore, the files will be written by default to sub-directories of the current working directory. To avoid this behaviour, one should first seed the Persistent Configuration Repository by creating an empty globals.yaml file under one of the paths specified by CFGPATH. This is only necessary once, when the repository does not yet exist. For example, assuming CFGPATH contains the path /home/eltdev/config and we want to map the URI cii.config://local/myrepo to be a sub-directory of that path, we need to create the globals.yaml file as follows:
$ mkdir -p /home/eltdev/config/myrepo
$ touch /home/eltdev/config/myrepo/globals.yaml
Remember that the path part of the URI, i.e. everything after cii.config://local/, is appended to one of the paths found in CFGPATH to deduce the full file path on the local filesystem. See the CII configuration service documentation for more details.
One can now create new datapoints as usual and have the files automatically modified under the /home/eltdev/config/myrepo directory. For example, the following command will create the file /home/eltdev/config/myrepo/depl1/defaults/comp1.yaml, rather than something in the current working directory:
$ rtctkConfigTool --persistent-repo-endpoint cii.config://local/myrepo \
      set persistent /depl1/defaults/comp1/static/param 123
Get
Get is used to retrieve the contents of a single datapoint. You have to specify the repository and the path to the datapoint you want to get. For example:
$ rtctkConfigTool get runtime /data/my_data_point
This will print the output as a string that is not always compatible with Python literal syntax.
The --use-repr flag can be used to print output using the Python repr function to produce
compatible output instead.
Get datapoint type
To get the type of a datapoint, use the --type option.
For example:
$ rtctkConfigTool get runtime /my_data_point --type
Get datapoint size
To get the size of a datapoint, use the --type option.
This will return the size in bytes for scalars, and the total number of elements for vectors and
matrices.
For example:
$ rtctkConfigTool get runtime /my_data_point --size
Get server alias
In the Runtime Configuration Repository, every datapoint has a server alias setting.
If this is set to a non-empty string, then it indicates the external Redis instance
(possibly a Redis cluster) on which the datapoint is stored.
Otherwise, an empty string for the server alias indicates the datapoint is stored in the OLDB’s
internal Redis instance.
To get the server alias setting, use the --server-alias option.
For example:
$ rtctkConfigTool get runtime /my_data_point --server-alias
Set
Set is used to change or create a datapoint. If the datapoint does not exist, it will be created with
the type given by --type. Otherwise, the type of the existing datapoint has to match what is
given by --type. If the type is not given, it is inferred from the exiting datapoint
or from parsing the value on the command line. For numeric values, 64-bit integer and floating-point
types are used if the type must be implicitly inferred.
The value argument should use Python syntax for literals. Examples of this syntax are indicated below.
Set a boolean:
$ rtctkConfigTool set runtime /data/my_data_point True
$ rtctkConfigTool set runtime /data/my_data_point False
Set an integer (the first two examples are equivalent):
$ rtctkConfigTool set runtime /data/my_data_point 42
$ rtctkConfigTool set runtime /data/my_data_point --type RtcInt64 42

$ rtctkConfigTool set persistent /data/my_data_point --type RtcInt32 -42
Set a floating-point number (the first two examples are equivalent):
$ rtctkConfigTool set runtime /data/my_data_point 1.23
$ rtctkConfigTool set runtime /data/my_data_point --type RtcDouble 1.23

$ rtctkConfigTool set persistent /data/my_data_point --type RtcFloat -1.23
Set a string (the two examples are equivalent):
$ rtctkConfigTool set runtime /data/my_data_point --type RtcString abc
$ rtctkConfigTool set runtime /data/my_data_point "'abc'"
Set a binary blob (the two examples are equivalent):
$ rtctkConfigTool set runtime /data/my_data_point --type RtcBinary a2bc
$ rtctkConfigTool set runtime /data/my_data_point "b'a\x32bc'"
Set a vector:
$ rtctkConfigTool set runtime /data/my_data_point --type RtcVectorBool "[True, False]"
$ rtctkConfigTool set runtime /data/my_data_point --type RtcVectorInt32 "[1, 2]"
$ rtctkConfigTool set runtime /data/my_data_point --type RtcVectorDouble "[3.5, 7.25]"
$ rtctkConfigTool set runtime /data/my_data_point --type RtcVectorString "['abc', 'xyz']"
$ rtctkConfigTool set runtime /data/empty_data_point --type RtcVectorInt64 "[]"
Set a matrix:
$ rtctkConfigTool set runtime /data/my_data_point \
                  --type RtcMatrixBool "[[True, False], [True, False]]"
$ rtctkConfigTool set runtime /data/my_data_point \
                  --type RtcMatrixInt32 "[[1, -2], [3, -4]]"
$ rtctkConfigTool set runtime /data/my_data_point \
                  --type RtcMatrixDouble "[[1.2, 2.3], [3.4, 4.5]]"
$ rtctkConfigTool set runtime /data/my_data_point \
                  --type RtcMatrixString "[['a', 'b'], ['c', 'd']]"
$ rtctkConfigTool set runtime /data/empty_data_point --type RtcMatrixInt64 "[[]]"
For datapoints in the Runtime Configuration Repository, i.e. when using runtime,
it is possible to explicitly set the server alias setting for the datapoint by using the
--server-alias option.
This makes it possible to control in which external Redis the datapoint should be stored.
For example, the following command will create a datapoint on the Redis instance configured with the
server alias name ext_redis_1:
$ rtctkConfigTool set runtime /data/my_data_point 42 --server-alias ext_redis_1
Note
The server alias setting is applied to the datapoint when it is created.
Therefore if the datapoint already exists, but the server alias given in the --server-alias
option does not match, the datapoint will be deleted and recreated.
If the datapoint already exists and --server-alias was not provided, then the server alias
setting is assumed to be correct and the datapoint will simply be updated on the appropriate
Redis instance.
If the datapoint does not yet exist and --server-alias was not provided, then the server
alias setting is not modified, in which case the default is to use the OLDB’s internal Redis
instance.
The appropriate server alias string to use is defined by the OLDB configuration.
One can see this information under the redisServersExternal entry from the output of the
following command:
$ oldbAdmin --list-config
Delete
Delete removes a datapoint. For example:
$ rtctkConfigTool delete runtime /data/my_data_point
List
Shows the sub-paths and datapoints within a given path. For example:
$ rtctkConfigTool list runtime /data/
Data Points:
RtcInt32: /data/my_data_point

Sub Paths:
Read
Reads the contents of a datapoint or hierarchy and exports them to one or more local files. A single numerical vector or matrix datapoint can be written to a FITS file if an output file name ending in .fits is provided. For example:
$ rtctkConfigTool read runtime /my_data_point output_data.fits
A whole hierarchy can be read out to a YAML file if a file name ending with .yaml is provided instead. The YAML file uses the same schema as the CII configuration service. For example, the following will read out all datapoints recursively under /component/static into the YAML file output.yaml:
$ rtctkConfigTool read runtime /component/static output.yaml
Alternatively, if an output directory is provided, the datapoints are written into one or more files under the directory using the same layout as indicated in Layout and Directory Structure. The following is an example of reading out the entire Persistent Configuration Repository into a local directory:
$ rtctkConfigTool read persistent / output_repository/
Write
Imports the data from one or more local files and writes the contents to a datapoint or hierarchy. A single numerical vector or matrix can be updated from a FITS file if an input file name ending in .fits is provided. For example:
$ rtctkConfigTool write runtime /my_data_point my_new_data_point_data.fits
A YAML file can be provided instead if the input file name ends with .yaml. In such a case, all datapoints encoded in the YAML file will be written to the corresponding datapoints in the target repository, using datapoint paths relative to the path provided to the write sub-command. The YAML must use the same schema as the CII configuration service. For example, if the following command is used to write to the location /component:
$ rtctkConfigTool write runtime /component input.yaml
and the input.yaml file has the following contents:
static:
    dp1: !cfg.type:int64 12
    dp2: !cfg.type:int64 42
dynamic:
    dp3: !cfg.type:double 9.75
the datapoints with paths /component/static/dp1, /component/static/dp2 and /component/dynamic/dp3 will be created and written.
If a directory is provided as the input to the write sub-command, then it is interpreted to have the same layout as indicated in Layout and Directory Structure. The path to copy then indicates the part of the hierarchy that should be copied recursively. For example, the following command copies all datapoints under /deployment_a from the input files under local_repository/ to the Persistent Configuration Repository under the same /deployment_a location:
$ rtctkConfigTool write persistent /deployment_a local_repository/
Note that in all of the cases above, if a datapoint’s type does not match what is indicated in the input files, the datapoint is recreated with the new type as needed.
The write sub-command also supports the --server-alias option when using the runtime
repository.
It works in the same manner as for the set command.
For details, see the Set command section.
Validate
Runs validation checks on the Persistent Configuration Repository to make sure the contents and structure of the configuration is correct. This will check all Deployment Sets in the configuration, therefore it may take some time to complete. It is however good practice to run this command before populating the Runtime Configuration Repository. See the PopulateConfig::ValidatePersistentRepository() method’s documentation for details of the checks performed.
Use the following command as an example to validate the configuration:
$ rtctkConfigTool --psr cii.config://local/persistent_repo validate
Populate
Validates (if no option --no-validation is given)
the Persistent Configuration Repository and
populates the Runtime Configuration Repository with the deployment information stored in the
Persistent Configuration Repository.
The logic to populate the repository is the same as is used during the initialisation stage of the
RTC Supervisor. This provides a mechanism to manually trigger the population logic rather than
performing it automatically by RTC Supervisor.
See also Configuration Layout for a detailed description of the configuration layout
for Deployment Sets.
Use the following command as an example for populating cii.oldb:/example/runtime_repo from file:/example/persistent_repo:
$ rtctkConfigTool --psr file:/example/persistent_repo \
                  --rtr cii.oldb:/example/runtime_repo populate
Graphical User Interface
Use the gui sub-command to display the graphical panels for viewing both the Persistent and
Runtime Configuration Repositories.
For example:
$ rtctkConfigTool gui
This will bring up a main window with a tree view of the contents of the repositories as shown in Fig. 3. The main window contains the following graphical elements and controls:
Tabs to allow switching between viewing the Persistent Configuration Repository and Runtime Configuration Repository.
A tree view of the datapoint hierarchy is visible, which corresponds to the datapoint path hierarchy. It is possible to collapse part of the tree by clicking on the small down arrow icons.
The value of the datapoint is shown in the second column of the tree view. Only scalars can be fully visualised in the tree view.
The type of the datapoint is shown in the third column of the tree view. This is the same type name that can be used with the
--typecommand line option.When a specific datapoint is selected in the tree view, the edit/visualisation panel on the right hand side will update and show specialised widgets corresponding to the datapoint’s type.
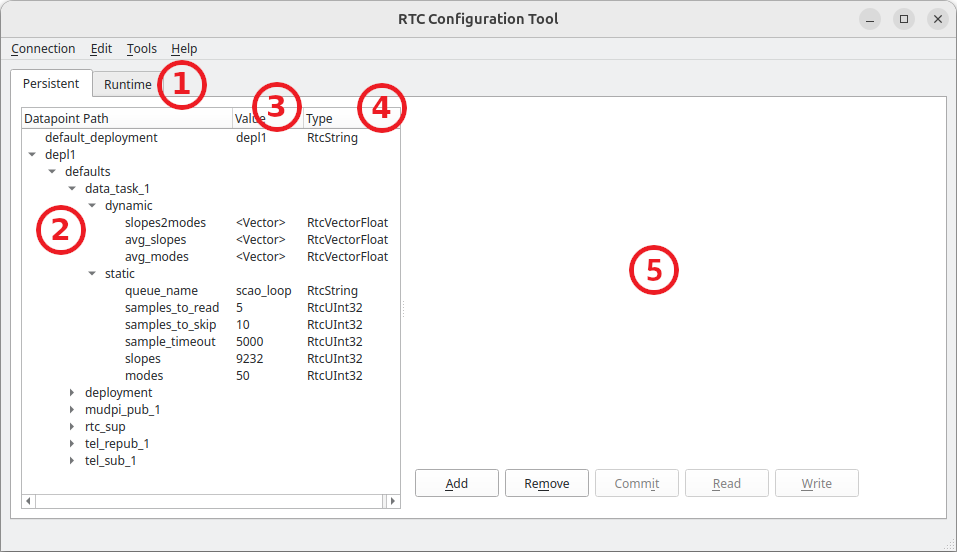
Fig. 3 The main window of the rtctkConfigTool.
The following actions are available when clicking on the Connection menu item in the top menu
bar as shown in Fig. 4:
It is possible to reconnect to the repositories with the
Reconnectaction. This will disconnect the application from the repositories, reconnect and then reload the data displayed in the tree view. This action can also be triggered with a keyboard shortcut by pressing theCtrlandRkeys at the same time.To terminate the application click on the
Exitaction. This can also be triggered by pressing theCtrlandXkeys at the same time.To validate the configuration in the Persistent Configuration Repository click on the
Tools -> Validatemenu option.
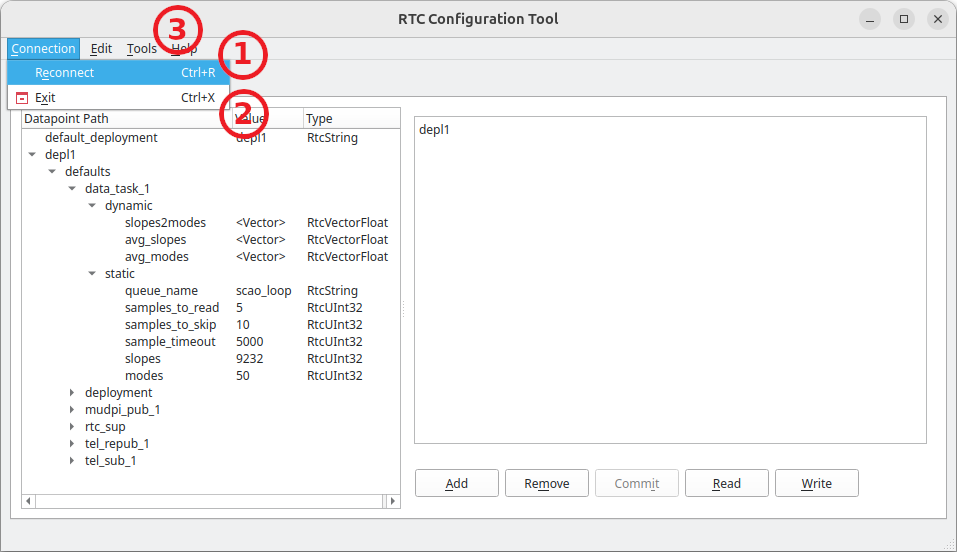
Fig. 4 The rtctkConfigTool’s connection menu.
Binary datapoints are visualised as shown in Fig. 5, with the following visual elements available:
The datapoint can be selected in the tree view.
The hexadecimal representation of the raw bytes is shown as 16 columns, grouped into 2 long words of 8 bytes.
The equivalent text characters are also shown further on the right hand side. If the raw byte cannot be converted into an equivalent character, a period (
.) is displayed instead.
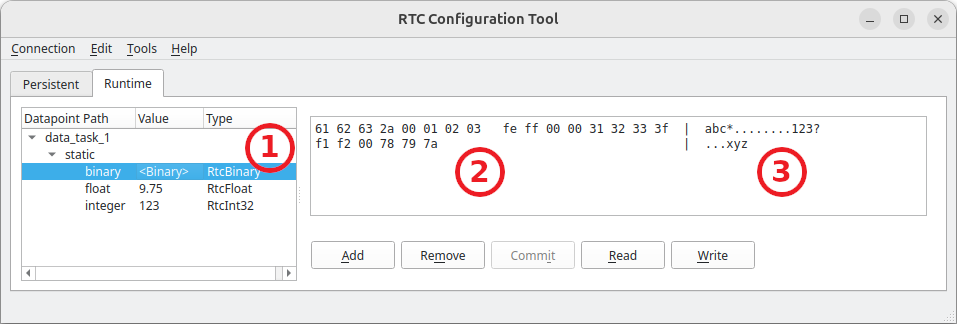
Fig. 5 The binary visualisation panel in rtctkConfigTool.
Floating-point numbers can be edited as shown in Fig. 6, with the following visual elements available:
Double clicking on the datapoint in the tree view under the
Valuecolumn starts the editing operation for the datapoint. Once the value has been modified, to complete the update of the value, either theEnterkey can be pressed on the keyboard, or one can navigate away to a different datapoint. Pressing theEsckey will cancel the modification and leave the original value as is. If the value has been changed, theCommitbutton will become enabled, which allows committing the data back to the repository.It is also possible to modify the datapoint value in the edit control in the right hand panel, similarly to editing it in the tree view.
Note
The accepted format for floating-point numbers is decimal notation, e.g. 1.25, or
scientific/engineering notation, e.g. 1.95e-3.
Positive and negative infinities are also accepted, e.g. inf or -inf,
including not-a-number (NaN) values, e.g. nan.
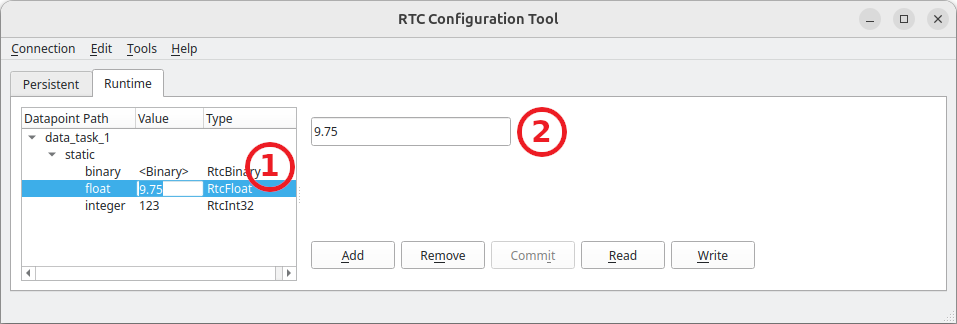
Fig. 6 The floating-point editing controls in rtctkConfigTool.
Integer numbers can be edited as shown in Fig. 7, with the following visual elements available:
Double clicking on the datapoint in the tree view under the
Valuecolumn starts the editing operation for the datapoint. The integer can be typed out or the up/down spin buttons can be clicked to increment/decrement the integer. Pressing the up/down keys on the keyboard is the equivalent of clicking on the spin buttons. Once the value has been modified, to complete the update of the value, either theEnterkey can be pressed on the keyboard, or one can navigate away to a different datapoint. Pressing theEsckey will cancel the modification and leave the original value as is. If the value has been changed, theCommitbutton will become enabled, which allows committing the data back to the repository.It is also possible to modify the datapoint value in the edit control in the right hand panel, similarly to editing it in the tree view.
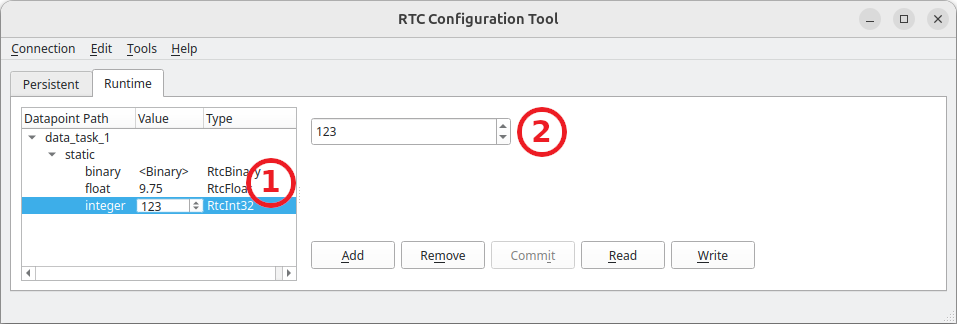
Fig. 7 The integer editing controls in rtctkConfigTool.
For matrix datapoints the following functions and controls will be available as shown in Fig. 8:
A matrix datapoint type needs to be selected to see the image view in the right hand panel. Note that for string matrices only the table will be shown.
It is possible to switch between an image view for visualisation and a table view for editing.
The data for numerical matrices will be shown as an image in the right hand panel, if the
Imagetab is selected. See the Taurus documentation for more information about the controls available inside the image widget.
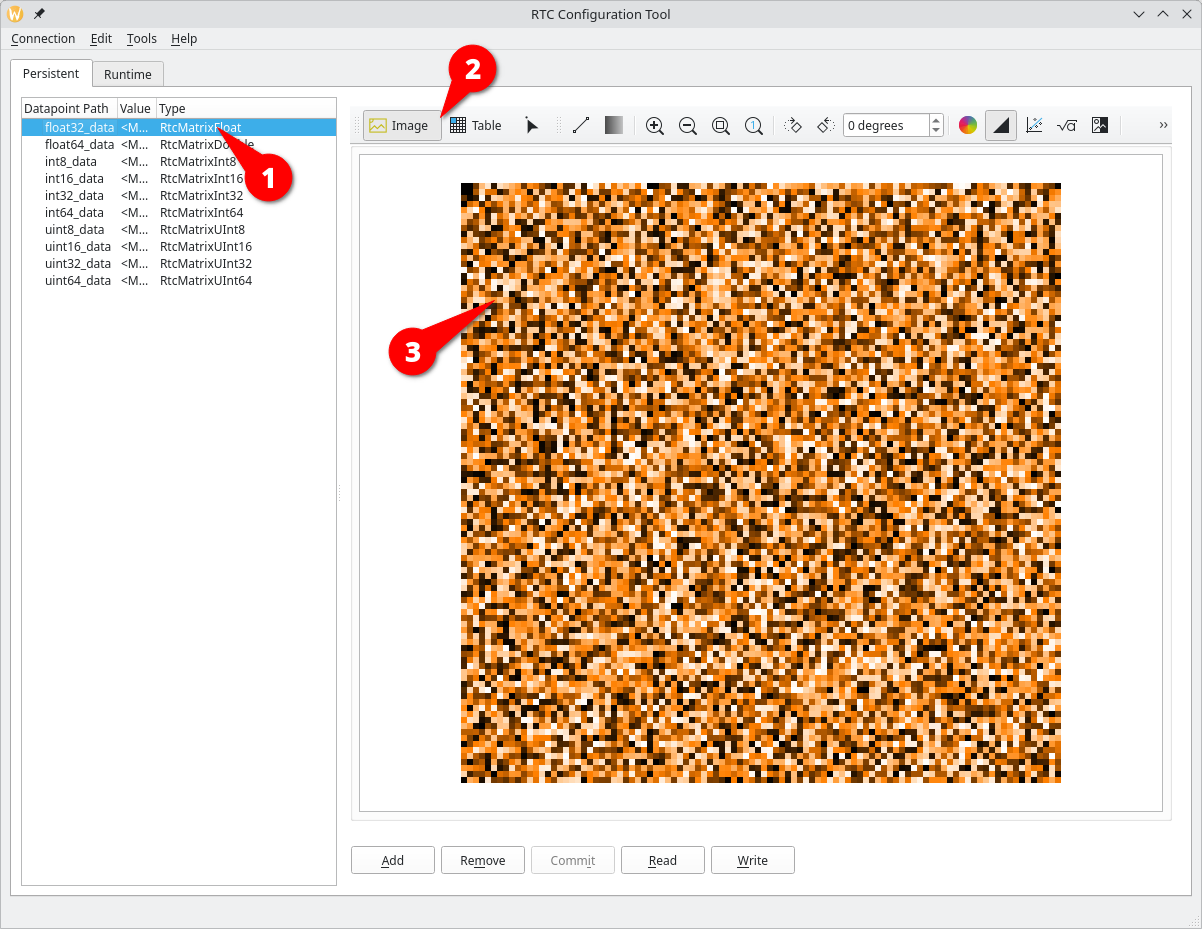
Fig. 8 The matrix image view in rtctkConfigTool.
It is possible to edit the matrix data with the controls in the right hand panel as shown in Fig. 9:
Selecting the
Tabletab will show a table view of the matrix data.Double-click on individual cells within the table view to change the value of an element in the matrix. It is also possible to select one or more cells and then drag and drop them to another location in the table. This will have the effect of duplicating the data to another part of the matrix.
Once a value has been modified the
Commitbutton will become available. It is then possible to click on this button to commit the changes to the underlying repository. While the changes are not committed, they remain in cache in the client application. It is possible to make modifications to several datapoints before clicking on theCommitbutton. This will commit all changes together in a batch.Click on the
Readbutton to download the currently selected matrix to either a FITS (.fits) or YAML (.yaml) file on the local disk. A file selection dialog will appear to select the name of the local output file to write to. This operation corresponds to the command line Read sub-command.Click on the
Writebutton to upload data from a local FITS (.fits) or YAML (.yaml) file into the currently selected matrix datapoint. A file selection dialog will appear to select the name of the local input file to read from. This operation corresponds to the command line Write sub-command.
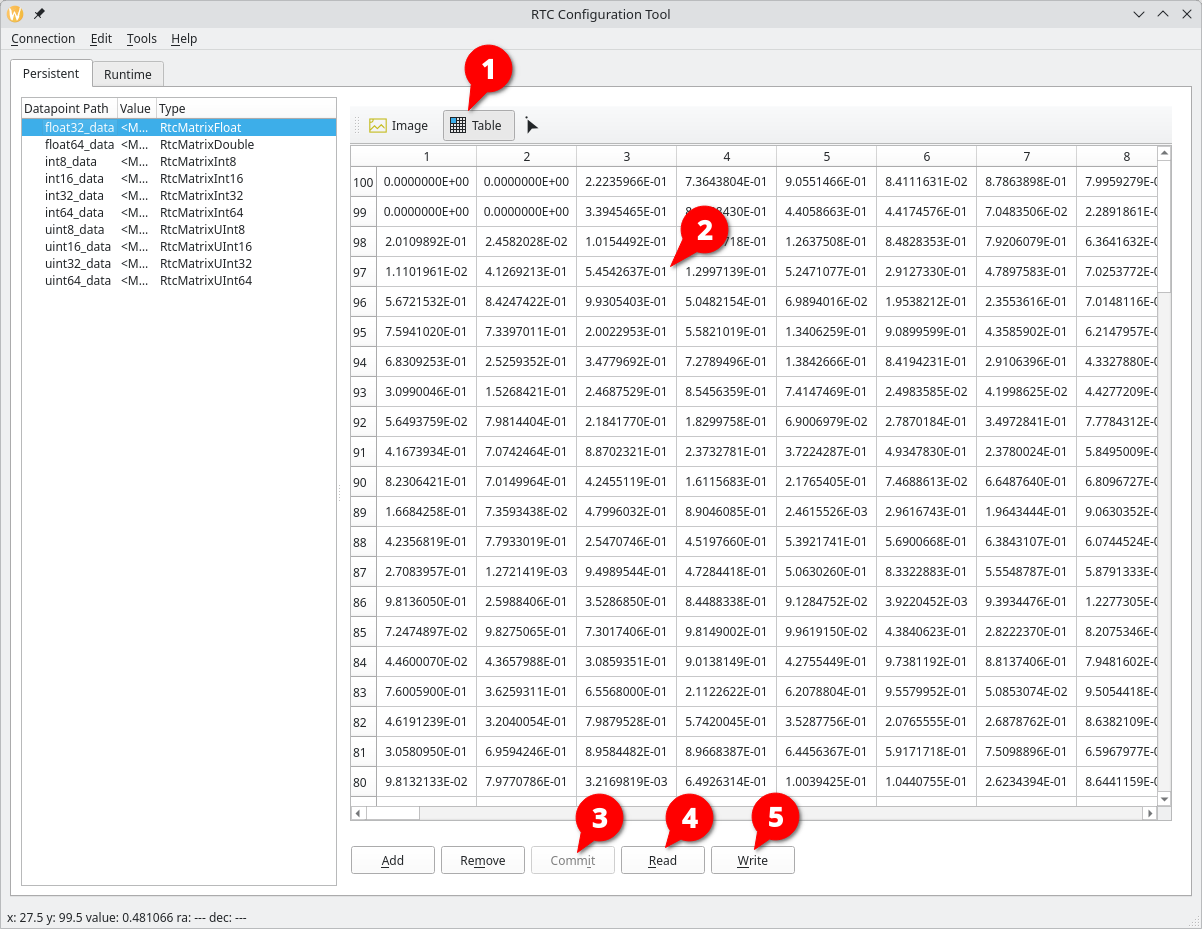
Fig. 9 The matrix edit panel in rtctkConfigTool.
The Matrix Image and Table views are coordinated as shown in Fig. 10
The top-left pixel in the Image view corresponds to the …
Top-left cell in the table.
If the table is too big, you can coordinate the image and table views with the mouse cursor. By selecting the pixel in the image view the corresponding cell will be shown in the table view. Use the button indicated in (#3), and pass the mouse over the pixel you are searching for. The Table will scroll automatically to that section. Press Ctrl-Space to terminate the coordination.
Take notice that the table shows the rows from the highest to the lowest, matching the coordinate system of the image.
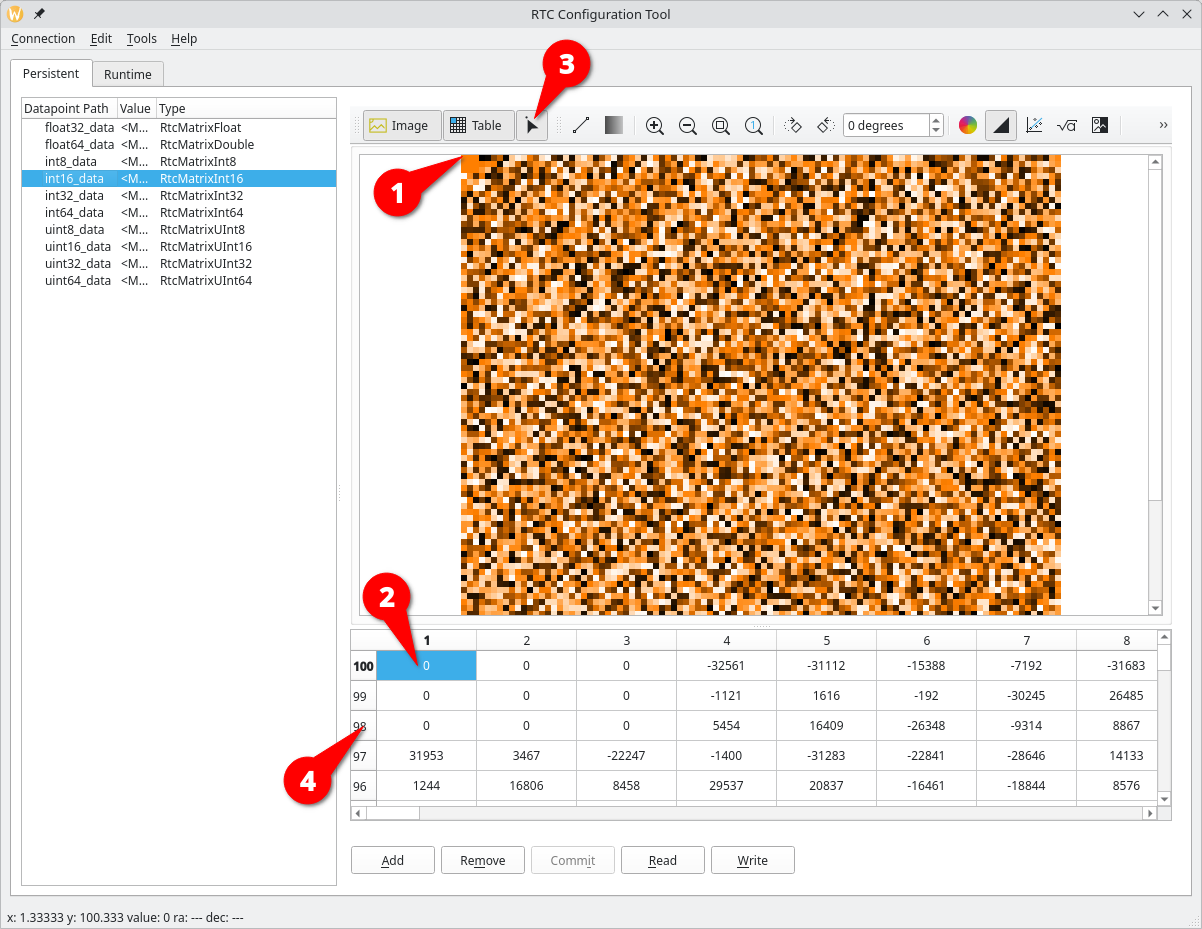
Fig. 10 Matrix view coordination between table and image.
For vector datapoints, the set of functions and controls is the same as for matrices as shown in Fig. 11:
A vector datapoint type needs to be selected to see the plot view in the right hand panel. For string matrices only the table will be shown.
It is possible to switch between a plot view for visualisation and a table view for editing.
The data for numerical vectors will be shown as an image in the right hand panel, if the
Imagetab is selected.
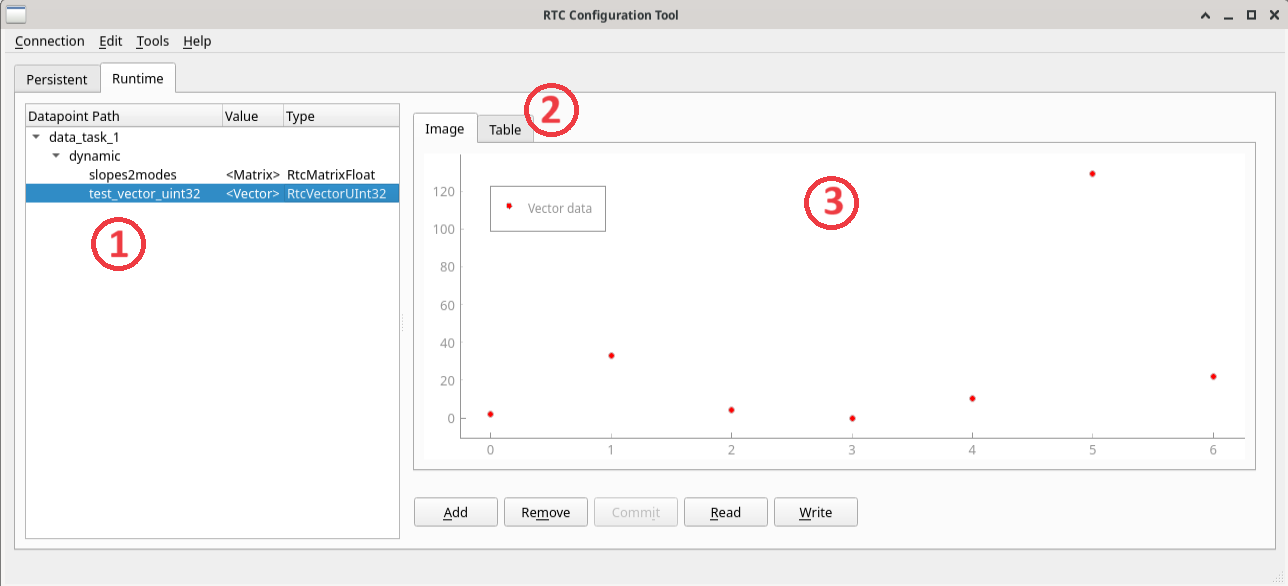
Fig. 11 The vector plot view in rtctkConfigTool.
It is possible to edit the vector data with the controls in the right hand panel as shown in Fig. 12:
Selecting the
Tabletab will show a table view of the vector data.Double-click on individual cells within the table view to change the value of an element in the matrix. It is also possible to select one or more cells and then drag and drop them to another location in the table. This will have the effect of duplicating the data to another part of the vector.
Once a value has been modified the
Commitbutton will become available. It is then possible to click on this button to commit the changes to the underlying repository. While the changes are not committed, they remain in cache in the client application. It is possible to make modifications to several datapoints before clicking on theCommitbutton. This will commit all changes together in a batch.Click on the
Readbutton to download the currently selected vector to either a FITS (.fits) or YAML (.yaml) file on the local disk. A file selection dialog will appear to select the name of the local output file to write to. This operation corresponds to the command line Read sub-command.Click on the
Writebutton to upload data from a local FITS (.fits) or YAML (.yaml) file into the currently selected vector datapoint. A file selection dialog will appear to select the name of the local input file to read from. This operation corresponds to the command line Write sub-command.
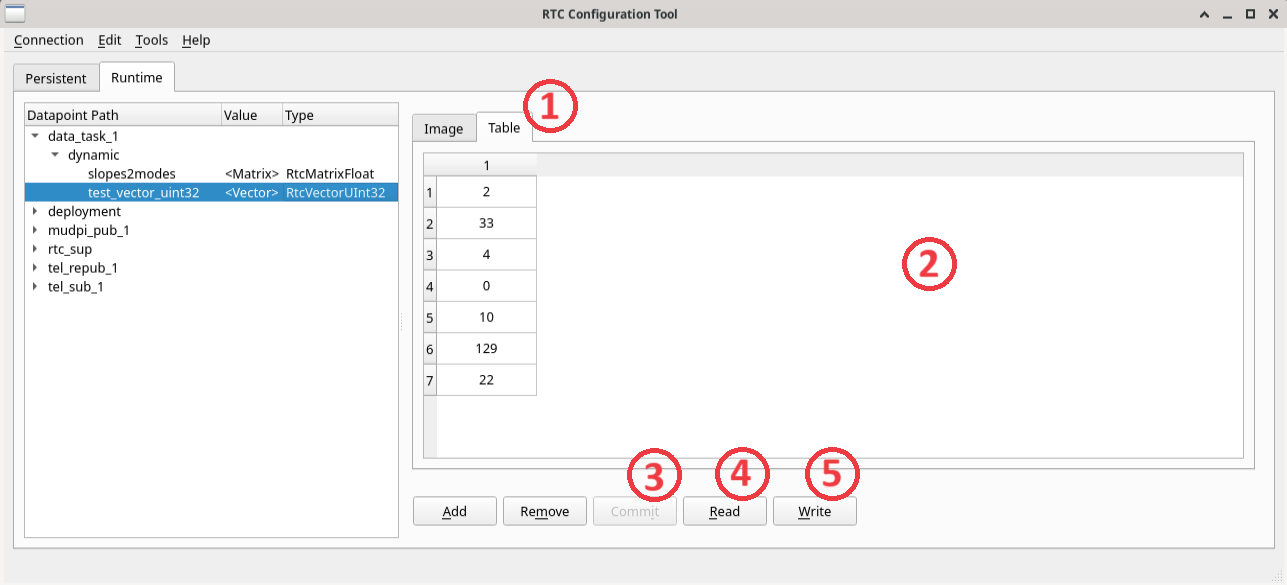
Fig. 12 The vector edit panel in rtctkConfigTool.
Interactive Shell
For more advanced interactive usage it is possible to enter a Python shell and interact with the repository via Python commands. For example:
$ rtctkConfigTool shell
Within the shell, one has access to the repository through the repository variable.
By default, the repository variable is set up to use the Runtime Configuration Repository.
To select the Persistent Configuration Repository instead, use the --repo option.
For example:
$ rtctkConfigTool shell --repo persistent
Once inside the shell, use the help(repository) Python command to see all available methods and
associated documentation for the repository object as follows:
fedora eltdev:~ 1 > rtctkConfigTool shell
...
The repository object is accessible through the 'repository' variable.
In [1]: help(repository)
Interaction involves executing Python commands within the shell. For example, the following fetches a datapoint value for a particular datapoint path:
In [2]: repository.get_data_point(DataPointPath("/datapoint"))
Limitations and Known Issues
Only the
cii.config://local/URI scheme is supported for the Persistent Configuration Repository.The datapoints do not refresh automatically. The values are the ones loaded at the time the application was started or reconnected to the repositories.
If the
DISPLAYenvironment variable is not set,rtctkConfigTool guiwill crash on startup (RTCTK-1330).The
rtctkConfigToolmay silently ignore non-existant datapoints on the command line (RTCTK-1270).
See also the limitations indicated for the Persistent Configuration Repository in section Limitations and Known Issues and for the Runtime Configuration Repository in section Limitations and Known Issues.